Field Craft
How to Make a Padded Javelin
As with the ancient Romans, we adapt quickly to new technologies. The mindset behind Eryndor Design 351 is to build an extremely well-padded spear: the result is a hefty (20–22 oz), large-headed javelin that looks ugly but flies very well and has exceptional durability. Use only high-density open-cell foam — poor-quality open cell will result in a failed javelin. A thin-walled, larger-diameter PVC core can be substituted for the recommended core if desired.
Cost
$20 – $30
Build Time
~90 minutes
Weight
20 – 22 oz
Steps
13
Each diagram below shows the javelin from the side and from the front — as though it is about to hit you in the eye. Read Step 7 carefully: it is the one finicky step in an otherwise simple build, and it takes a developed foamsmithing "touch" to execute properly.
Materials
Design Key
- 3/4" Schedule 40 PVC — the weapon core; thin-walled larger-diameter PVC may be substituted
- Blue camping foam (closed-cell) — shaft padding, head base, and support wrap
- 1/2" EVALite — sandwiched inside the striking surface for firmness
- 2" high-density open-cell foam — Uniloam or computer packing foam; this is the tip
- 14" square yellow fabric — covers the head and marks it as a javelin
- Duct tape — secures every seam and covers the shaft and pommel
- DAP Contact Cement — primary adhesive; Spray Adhesive is better for open-cell foam joints
- Hockey tape — optional grip wrap
Making the Head — Steps 1–7
- Cut and cap the PVC core. Cut a piece of 3/4" Schedule 40 PVC to between 3 ft. 7 in. and 3 ft. 10 in. Longer than this and the javelin may become overweight and fail inspection. Cap both ends with duct tape wraps.
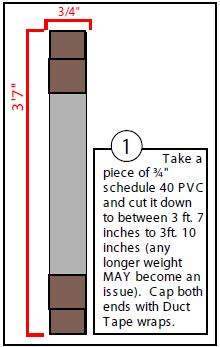 Step 1: Cut and Cap the PVC Core
 - Build the striking-surface base. Take a 5" × 20" strip of blue camping foam. Coat both sides with DAP Contact Cement, then spiral-wrap it flush against one end of the PVC. This is how you build up the base of the striking surface. The finished cylindrical wrap should measure approximately 3.5" in diameter.
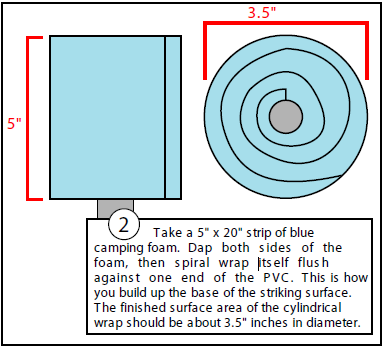 Step 2: Build the Striking-Surface Base
 - Make the closed-cell foam sandwich. Cut two 3.5" circles of blue camping foam and one 3.5" circle of EVALite. (Octagons work if precise circles are too difficult to cut.) DAP the three pieces together so the EVALite is sandwiched between the two blue foam circles.
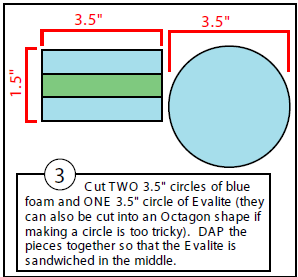 Step 3: Make the Closed-Cell Foam Sandwich
 - Attach the foam sandwich. DAP the foam sandwich from Step 3 onto the foam base you built in Step 2.
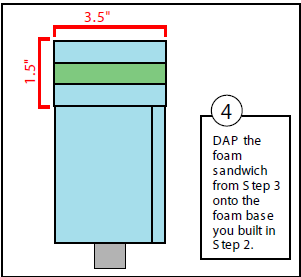 Step 4: Attach the Foam Sandwich
 - Prepare the open-cell foam tip. Cut two 2"-thick pieces of high-density open-cell foam into 4.5" circles or octagons. DAP the two pieces together. Spray Adhesive is superior to DAP for this joint if you have it available.
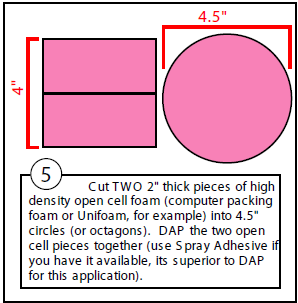 Step 5: Prepare the Open-Cell Foam Tip
 - Attach the open-cell tip. Center the open-cell foam stack on top of the javelin head and DAP it into place. If you have foams of different densities, place the denser foam closer to the PVC core (at the bottom).
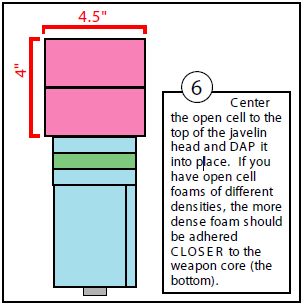 Step 6: Attach the Open-Cell Tip
 - Add the support wrap (the most important step). The javelin head is now safe but wobbly. To stabilize it, take a 4" × 13.5" piece of blue camping foam. Coat it with DAP, overlapping 2" onto the open-cell foam and 2" onto the closed-cell foam below. Wrench the wrap tightly around the head — compress the open-cell foam and pull firmly. DAP the seam edges where the foam ends meet, then run duct tape over the full seam. Without the tape, the seam will peel away.
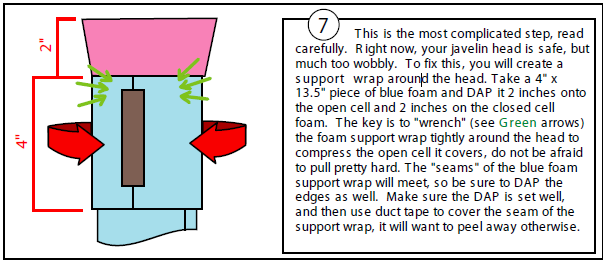 Step 7: Add the Support Wrap
Making the Shaft & Pommel — Steps 8–10
- Wrap the shaft. Cut a piece of blue camping foam 4.5" wide and 38" long (the length of the remaining exposed PVC). DAP and wrap it down the full shaft, letting the foam overlap itself slightly. An imperfect cylinder is fine — overlapping foam is less likely to separate and create the permanent gaps that are a common cause of javelin failure. Immediately duct-tape the seam as you go to hold the foam in place while the DAP cures. Alternatively, pipe foam insulation can be used to cover the shaft.
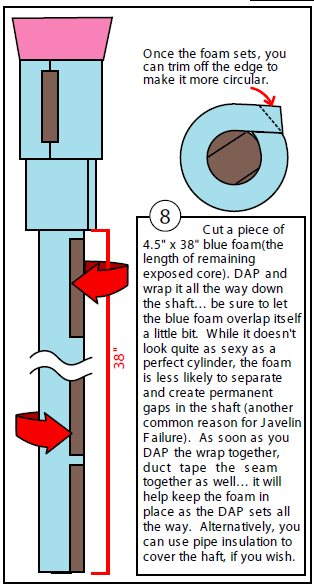 Step 8: Wrap the Shaft
 - Build the pommel base. Cut two 1.75" circles (or octagons) of blue foam. DAP them together, then DAP the stack to the bottom of the PVC.
 Step 9: Build the Pommel Base
 - Wrap the pommel. Take a 4" × 6.5" piece of blue foam and DAP-wrap it flush against the bottom end of the javelin. This completes the pommel.
 Step 10: Wrap the Pommel
Finishing Touches — Steps 11–13
- Cover the head with yellow fabric. Take a 14" square of yellow fabric. Place a small piece of duct tape on each of the four corners. Center the fabric over the top of the javelin head, pull each corner down onto the head, and press the tape strips to hold them in place.
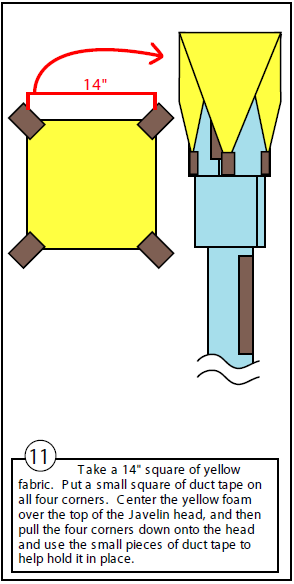 Step 11: Cover the Head with Yellow Fabric
 - Tape the head and pommel. Wrap the head in duct tape. Do not over-wrap — too many layers make the head too heavy. Wrap the pommel next: bottom first, then sides. Check the diagram above to see how far up the pommel to wrap.
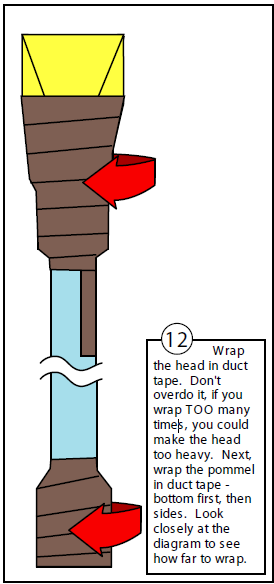 Step 12: Tape the Head and Pommel
 - Tape the shaft and mark the weapon. Run four long strips of duct tape down the shaft longwise. This holds better than spiral wrapping. Add your chapter symbol to the head — or if you don't have one, the Everledden LifeTree works quite nicely.
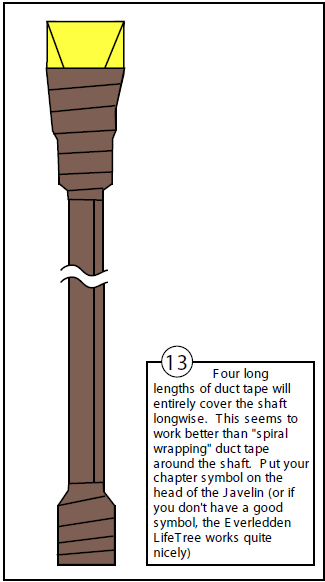 Step 13: Tape the Shaft and Mark the Weapon
Design 351, created by Andrew “Athron” Baker of Eryndor. Meets safety specifications per RWC XXI.
Download Original PDF— Dominus
Also in this series: How to Make a Padded Shield →